Tag Archives: Roomba

Everything You Need to Know about the Neato Robotics XV-11, iRobot Roomba, and Evolution Mint

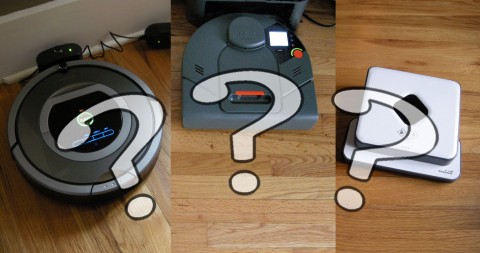
We’ve tested the Neato Robotics XV-11, iRobot Roomba 780, and the Evolution Mint and Mint Plus robots, and decided to put together something like a consumer reports style buying guide which compares and contrasts these products. All of these robotic floor cleaners are great labor-saving devices, but which device is going to be better for you depends on your preferences and situation.

Cleaning
In our testing, all the robots did a good job of cleaning floors, so cleaning in and of itself isn’t a reason to choose one brand over another. One of the things to keep in mind is that these devices have cumulative effect. So the more you use them, the more clean your floors will be overall. Here are the strengths and weaknesses of each of these robots:

Neato XV-11

Pros: Powerful vacuuming, maps the room, avoids bumping furniture, can vacuum whole house in one go, can be scheduled, has auto charging dock. Mostly easy to maintain and in our limited testing requires less maintenance than the Roomba.
Cons: No dirt-detect, no side brush, misses corners and areas right against furniture. Noisy. Will occasionally get lost or stuck. Can and will eat cords.

iRobot Roomba

Pros: Thorough vacuuming from a product which has been around a long time and thus has been improved and upgraded over the years. Many models can be scheduled, will detect dirty areas, and have auto charging docks. Newer models like Roomba 780 detect when they’ve sucked up cords and will spit them out.
Cons: Noisy, brushes and beaters require regular maintenance, robot runs into furniture,

Mint and Mint Plus

Pros: Silent, thorough, easy to use, maps the room as it goes, extremely easy to maintain. Can do double-duty, mopping as well as sweeping. Doesn’t require much room prep. Doesn’t eat cords. Takes up less storage space than the competition.
Cons: Can’t be scheduled, doesn’t do carpets, won’t automatically dock to charger.

There really are some differences. Check out these two movies which compare how these three robots handle the same tasks, cleaning around a table leg and cleaning a corner.

Head to head

Neato XV-11 vs iRobot Roomba
Executive Summary: We think that if the XV-11 had a side brush, and could stop eating cords, it would beat the Roomba, but for now, iRobot has the lead with the 700 Series robots.

By virtue of the fact that it runs into everything in the room, the Roomba is generally more noisy than the XV-11, which has a louder vacuum and beater. The Roomba strikes me as being more thorough, since it has a side brush, gets into corners better, and can fit under more furniture. The iRobot vacuum cleans sort of randomly, whereas the Neato maps out the room and cleans methodically, but our opinion is that, in the end, this doesn’t make that much of a difference to how clean the robot makes the room.

The XV-11 generally takes 30 minutes to clean our living room, and the Roomba takes about 50 minutes. The place where the XV-11 really outshines the Roomba is when it cleans multiple rooms. If you have thoroughly prepped all the rooms on one floor of your house, you can set the XV-11 running (or schedule it), and it will vacuum the entire floor with no human intervention and no need for arranging lighthouses. In our case, that’s a kitchen, bathroom, living room, office, and bedroom. Also, the XV-11 doesn’t bang into furniture and walls. Although it will gently bump things here and there, it is much more gentle with your furniture.

Neato XV-11 vs Evolution Mint Cleaner
Executive Summary: If your house is mostly hardwood floors/linoleum or you’re only interested in cleaning your kitchen and bathroom, the Mint is the clear winner. If purchasing a robot to clean lots of carpeted areas, then the Neato wins.

As with all comparisons to vacuum cleaners, the first thing that must be mentioned is that the Mint doesn’t do carpets. So if your house is mostly carpeted, your choice to get an XV-11 instead is a no brainer. Our seriously unscientific timing indicated that the Mint is usually faster to clean a room for some reason. The Mint is almost silent. The Mint doesn’t suck up things like cords and cables, and so the Mint is less obnoxious and requires less room prep before running.

The Mint is shorter than the XV-11 and thus can fit under more furniture than an XV-11. So once again, in an uncarpeted room, the Mint is going to be a little more thorough because it can get in more spots and also because it does corners way better. Sadly, the Mint cannot be scheduled. Again, as with the comparison to the Roomba, the XV-11 outshines the Mint in multi-room cleaning, and is also (just a little tiny bit) more gentle on furniture and walls than the Mint.

Evolution Mint Cleaner vs iRobot Roomba
Executive Summary: As with the above comparison, if your house isn’t mostly carpeted or you’re only interested in cleaning your kitchen and bathroom, the Mint is the clear winner. If you are interested in cleaning a carpeted house then the Roomba wins.

Yep, the Mint can’t do carpets. So that should be your number one factor in deciding between the two robots. The Mint cleans rooms much faster and is methodical where the Roomba is thorough with repetition. The Mint is quiet enough that you can have a phone conversation in the same room, whereas the Roomba you will want to run it when you’re not at home. The Mint doesn’t require as much room prep and almost no maintenance

Besides being the carpeting champ, the Roomba can be scheduled and also handles multi-room situations better than the Mint. The Roomba requires much more maintenance.

Mint vs iRobot Scooba
Executive Summary: Problems with the Scooba line make it a robot we can’t recommend. For instance, see this Amazon page for user reviews of the iRobot Scooba 380. This is true of the older Scoobas, as well as the new Scooba 230, which we reviewed here. Please see our comparison article, here.

If you’re looking for a mopping robot, you should really spring the extra money for the Mint Plus (a.k.a. the Mint model 5200), which has a special mopping head. See our review of the 5200 Mint here.

Wrap-up

And so there you have it. If you’ve got a house with a lot of carpeting, we recommend the Roomba 700 series robots over the Neato XV-11. There are cases where a person might want to go with the XV-11, which can clean a whole house floor in one go and is more gentle on the furniture. It’s also a little less expensive than most of the Roombas. For someone who is just buying a robot for kitchen and bathroom floors, the Mint is the obvious choice. With the Mint you get good performance and reliability at a much lower price. For a house that is mostly hardwood floors, the Mint might be the best choice there, too, depending on how many area rugs and how important some of the Roomba features (like scheduling) are to you.

Further Information

Neato Robotics XV-11 Reviews on Amazon

Evolution Robotics Mint on Amazon

Evolution Robotics Mint Plus on Amazon

Get the iRobot Roomba 780 Vacuum Cleaning Robot at Amazon

Click here to see more information on the Roomba 780 robot on iRobot’s website.
Excellent Idea! Robot AddOns Soft Bumper for iRobot Roomba

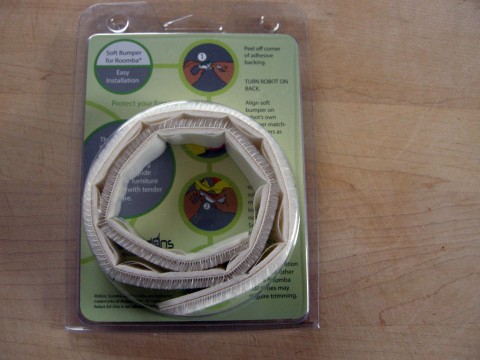
Here we’re reviewing the Robot Add-Ons Soft Bumper accessory for the Roomba. The idea is simple but ingenious. Roombas have a bad habit of plowing into table legs, and sometimes don’t see wall corners. So depending on the shape of the furniture leg or baseboard, a robot cleaner can leave some marks behind. Also, the robot will make banging noises while vacuuming, which is kind of annoying (if you’re around when your robot vacuums). Enter Robot AddOns Ultra Soft Bumper for Roomba.

Soft Bumper for Roomba by Robot Add Ons

It’s designed to protect your furniture from wear and tear caused by your robot vacuum as it cleans your house. The manufacturer, Robot AddOns, is a company that was started by some engineers who had worked at iRobot. They have developed a handful of interesting inventions to improve the functionality of your robot vacuum cleaner. Mostly, these items are designed to be used with Roombas, but a few of them could probably be put to good use with some other robots. For example, this Soft Bumper would probably work well with the Neato Robotics robot vacuum. It would make a great accessory for a Roomba 780 or other 700 Series. No doubt it would also work with the iRobot Scooba, and other robotic vacuums made by LG, Karcher, and Samsung.

Installing the Soft Bumper onto a Roomba

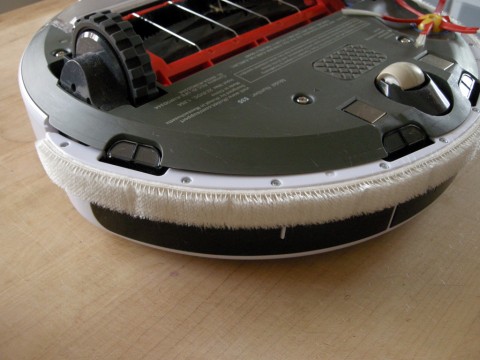
final position of the soft bumper

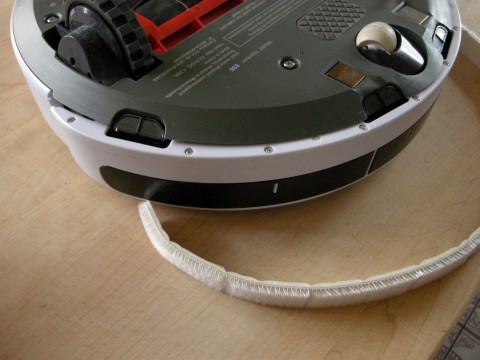
Installation is very easy. The bumper strip has adhesive on one side, so it’s as simple as applying tape to the bumper on your Roomba. Following the pictures in the instructional card that comes with the bumper, you set the Roomba on its back. Then start applying the Soft Bumper from one corner. Care needs to be taken so that you don’t cover the windows on the front of the robot. The windows have sensors behind them that detect walls and obstacles, so you don’t want to cover them. As a result, the tape should be applied with one edge along the bottom of the bumper. The instruction card also notes that the bumper tape might need to be trimmed on Roomba models other than the 500 Series.

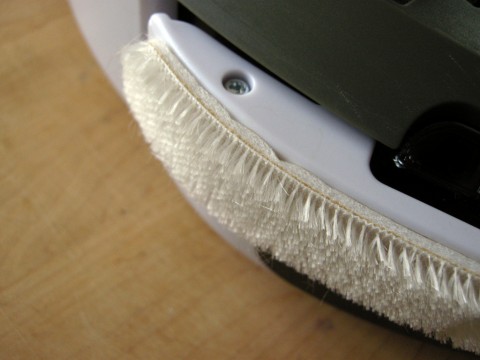
Close up view of the Soft Bumper

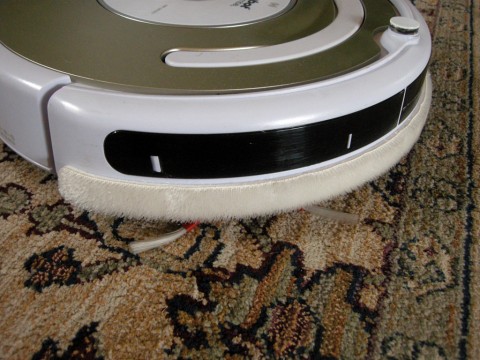
Here’s a close-up view of the Soft Bumper. As you can see, the outer layer is like a brush. It’s really soft. The inner layer is high density foam rubber. The inner layer is a little more firm. The idea is that the brush part protects from scratching the surfaces of your furniture and walls, and the foam will cushion the bumper when it hits furniture. The adhesive used on the soft bumper seemed strong enough to me that I would expect it to last for the life of the robot.

Soft Bumper installed and ready for action!

This is your Roomba with a beard! Now it looks normal to me, but I have to confess that I thought it was kind of funny looking at first. I had to get used to it.

So how does it work? We have a winner! Besides making your robot vacuum more gentle on your furniture, the Robot Add Ons Soft Bumper does make the robot operate in a much more quiet way. To be fair, the newer model Roombas do their best to slow down before they hit furniture and walls, but sometimes they don’t see an item. To be honest, I don’t know why iRobot doesn’t start including something like this with all the robots they sell. I’ve read some reviews where people complain that it changed the behavior of their Roomba, or that the Roomba has trouble docking with the strip installed, but I haven’t noticed anything like that. My Roomba acts and cleans just like it did before, without the banging. It’s really awesome, and would make a great gift for the Roomba fan in your house.

Check these links to read reviews and/or order the products on Amazon. Besides the Ultra Soft Bumper for Roomba, there is also a new Dual Ultra Soft Bumper for Roomba. This one has a second soft strip that you put along the top of the Roomba bumper for even more protection.

How to Fix Your 500 Series Cleaning Head Module

This article includes step-by-step instructions with photos for how to fix a problem with the iRobot Roomba Cleaning Head Module. This fix is a repair for modules when the brushes have stopped moving due to the build up of hair and debris in the gear box. If you’re handy at all, this should be a pretty easy fix. Obviously, this won’t necessarily resolve the problem in all cases. Be careful and do this at your own risk.

The Cleaning Head Module on the 500 Series iRobot Roombas are a sore spot for many robot owners. The problem being errors and maintenance problems caused by the slow accumulation of hair and debris in the gearbox of the Cleaning Head Module. The problem affects basically all the 500 and 600 series Roombas. So this means the 610 Professional, the 570, 572, 560, 562, 532, 530 and 510. As you can see, this includes the Pet Series Robot vacuum cleaners. I’m pretty sure that the 400 Series, 4000 Series, and earlier are also affected. As mentioned in my 780 review, the design of the Cleaning Head Module on the 700 Series Roombas is clearly different, but only time will tell if it has the same problems.

What happens is that the gear box of the Cleaning Head Module collects hair and debris over time and gets jammed up so that the brushes don’t turn while the robot vacuum is cleaning. As a result the ability of the Roomba to clean properly is affected, and the robot may also give errors or refuse to work. While it is possible to order a Roomba 500 600 700 Series Cleaning Head Replacement, you might be able to solve your problem by following the instructions, below.

Roomba Gearbox Repair

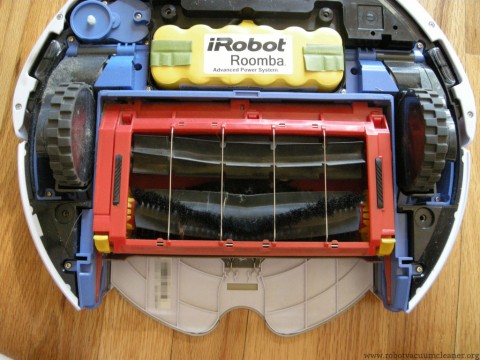
First remove the dust bin. Then remove the sidebrush by unscrewing the screw in its center and then pulling the side brush off. Next unscrew the four screws that hold the bottom panel on. They are the screws with the little triangle arrows next to them. These screws don’t come all the way out. You just need to unscrew them until they are loose and the panel can lift off.

Removing the Cleaning Module

With the bottom panel off, you can see the Cleaning Head Module. There are four more screws holding this on. There are two at the top of the module, next to the corners of the APS battery. The other two screws are near the bottom on either side of the module. The Cleaning Head Module looks kind of like a rectangular box with two arms coming off of it. These screws, like screws that hold the panel on, don’t screw out all the way, so you only have to screw them out enough until you can lift the module out of the body of the robot.

The Cleaning Head Module

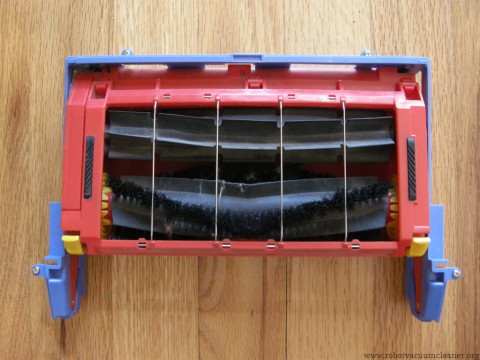
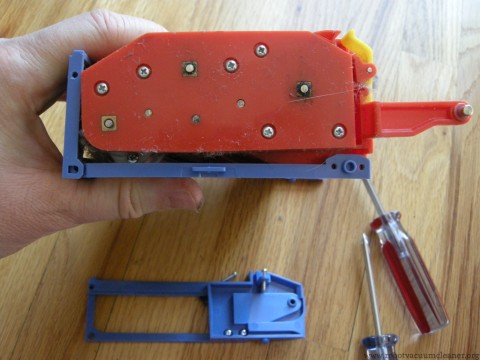
Here is the Cleaning Head Module out of the Roomba. The gearbox on this module is on the left side here, and is in the red part of the module. So you see there where the brushes go into the left side? That’s where the gear box is. The gearbox drives the brushes. That’s also where the hair and debris gets into the gearbox. Getting into the gearbox is a little more work. Here’s how you can do it.

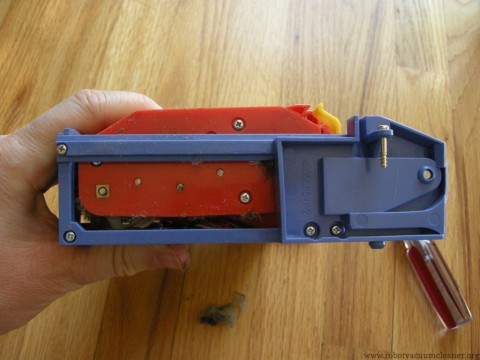
The side of the module with the gearbox

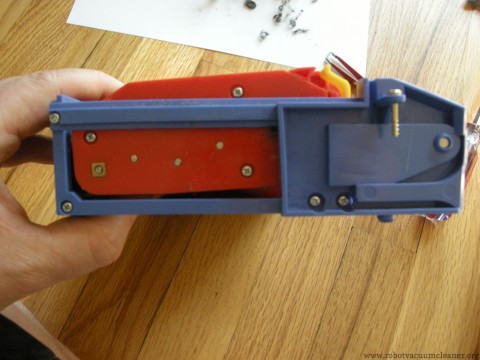
Pick up the module so that it’s on one end with the gearbox end pointing up towards you. Here you can see that there are four more screws which are holding the blue side of the module on. We need to take the side off so that we can get to the red part. So unscrew these four screws and lay them in one place.

The cleaning head gearbox side exposed

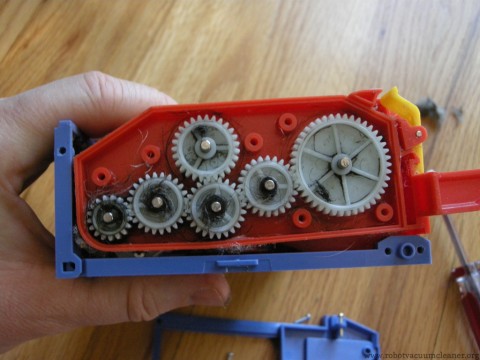
Here’s the cover on the gearbox. As you can see, we have six more screws that need to be removed and then we can take the side off. Remove and place the screws in a spot away from the other screws you pulled out previously, so that they don’t get mixed up.

Hair and debris in the gearbox

And here’s what might be in your Roomba’s Cleaning Head gearbox. My Roomba was functioning just fine, even with all this hair and debris, but you can see that there is some accumulation and that eventually this might render the module inoperable.

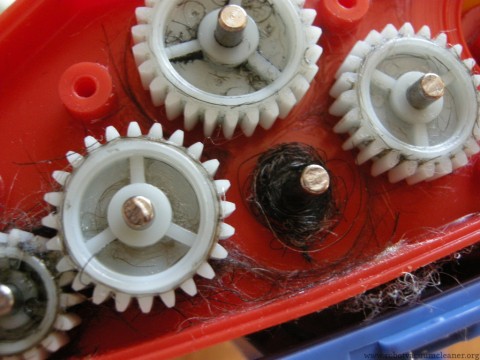
A roll of hair under a gear

While doing this cleaning, I only pulled one gear out at a time so that I wouldn’t lose the proper placement of the gears. I would guess that a person could probably take the gears and place them on a piece of paper with numbers to keep them straight, or find another way of keeping them in order, but I like to keep things simple. So what I would do is remove one gear, pull the hair off of it, and then remove any hair that was under it inside the gearbox.

It bears mentioning that the gearbox also contains a film of lubricant, and depending on your situation, you might be able to get away with just pulling out the hair and leaving most of the lubricant still in the gearbox. Not all kinds of lubricant are safe to use with plastic parts. If you know for a fact that you have a lubricant that is safe to use with plastic, then go ahead and really clean that gearbox out, and then put a little lube back in there. Otherwise, I suggest just doing your best to remove the hair and not wipe the gearbox out. (Note: Your local Radio Shack probably sells a plastic safe gel lubricant which would be appropriate.)

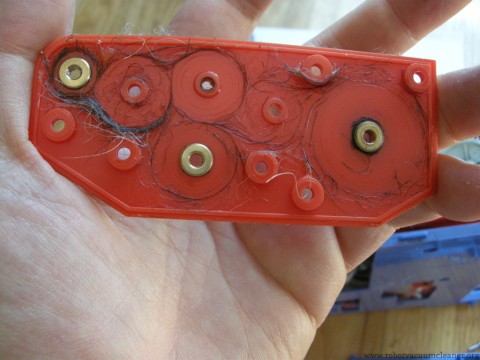
The inside of the gearbox cover

Here’s more area to clean. It’s worth noting that the engineers at iRobot have reinforced the plastic with brass for the holes that need it. I have found instructions online for boring out the insides of the gears in these gearboxes and installing gear bearings, but really, that’s something that a person shouldn’t be doing unless they have access to the proper tools for the job. Obviously, a metal gear train with bearings would be ideal. But nylon, stainless steel and brass have been used to make durable gear trains for a long time and in my humble opinion, the engineers at iRobot have created a suitable consumer-grade gear train. The problem is the holes for the brushes, not the gears themselves.

Put it all back together again

Once you’ve got the hair and fuzz and everything else out of the gearbox, carefully put it all back together again, and reassemble the robot following the instructions the other direction to assemble all the parts.

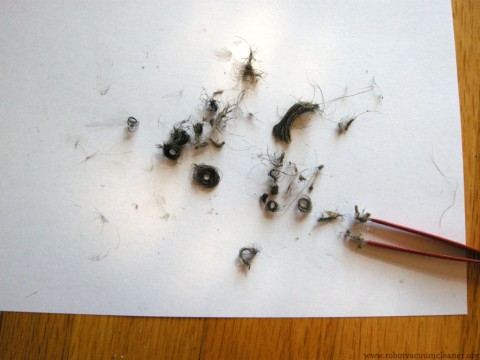
The debris from the gearbox

Here’s what I pulled out of this gearbox. I did this for the sake of demonstration, so if your Roomba’s brushes have stopped moving, I’m betting that you’ll be pulling a lot more than this out of your robotic vacuum.

Get a new iRobot Roomba 780 Vacuum Cleaning Robot on Amazon