Tag Archives: 500 Series

How to Fix Your 500 Series Cleaning Head Module

This article includes step-by-step instructions with photos for how to fix a problem with the iRobot Roomba Cleaning Head Module. This fix is a repair for modules when the brushes have stopped moving due to the build up of hair and debris in the gear box. If you’re handy at all, this should be a pretty easy fix. Obviously, this won’t necessarily resolve the problem in all cases. Be careful and do this at your own risk.

The Cleaning Head Module on the 500 Series iRobot Roombas are a sore spot for many robot owners. The problem being errors and maintenance problems caused by the slow accumulation of hair and debris in the gearbox of the Cleaning Head Module. The problem affects basically all the 500 and 600 series Roombas. So this means the 610 Professional, the 570, 572, 560, 562, 532, 530 and 510. As you can see, this includes the Pet Series Robot vacuum cleaners. I’m pretty sure that the 400 Series, 4000 Series, and earlier are also affected. As mentioned in my 780 review, the design of the Cleaning Head Module on the 700 Series Roombas is clearly different, but only time will tell if it has the same problems.

What happens is that the gear box of the Cleaning Head Module collects hair and debris over time and gets jammed up so that the brushes don’t turn while the robot vacuum is cleaning. As a result the ability of the Roomba to clean properly is affected, and the robot may also give errors or refuse to work. While it is possible to order a Roomba 500 600 700 Series Cleaning Head Replacement, you might be able to solve your problem by following the instructions, below.

Roomba Gearbox Repair

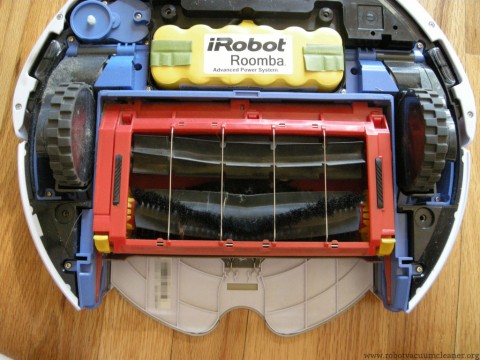
First remove the dust bin. Then remove the sidebrush by unscrewing the screw in its center and then pulling the side brush off. Next unscrew the four screws that hold the bottom panel on. They are the screws with the little triangle arrows next to them. These screws don’t come all the way out. You just need to unscrew them until they are loose and the panel can lift off.

Removing the Cleaning Module

With the bottom panel off, you can see the Cleaning Head Module. There are four more screws holding this on. There are two at the top of the module, next to the corners of the APS battery. The other two screws are near the bottom on either side of the module. The Cleaning Head Module looks kind of like a rectangular box with two arms coming off of it. These screws, like screws that hold the panel on, don’t screw out all the way, so you only have to screw them out enough until you can lift the module out of the body of the robot.

The Cleaning Head Module

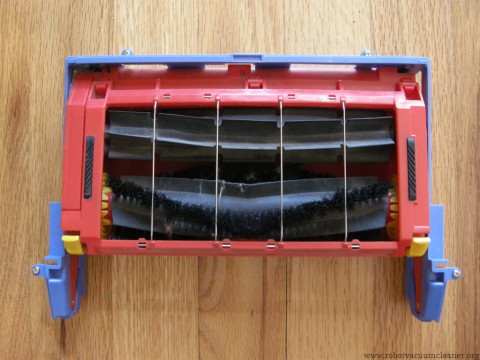
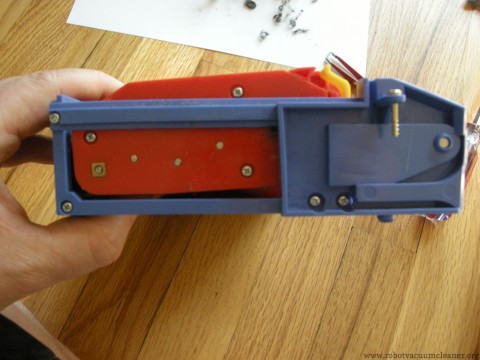
Here is the Cleaning Head Module out of the Roomba. The gearbox on this module is on the left side here, and is in the red part of the module. So you see there where the brushes go into the left side? That’s where the gear box is. The gearbox drives the brushes. That’s also where the hair and debris gets into the gearbox. Getting into the gearbox is a little more work. Here’s how you can do it.

The side of the module with the gearbox

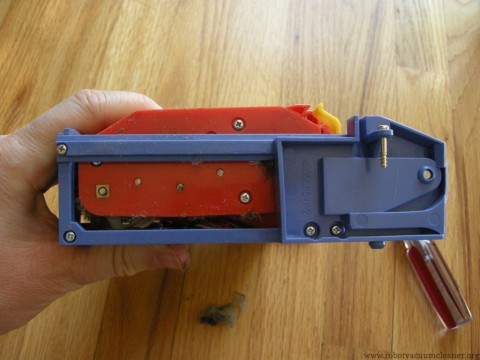
Pick up the module so that it’s on one end with the gearbox end pointing up towards you. Here you can see that there are four more screws which are holding the blue side of the module on. We need to take the side off so that we can get to the red part. So unscrew these four screws and lay them in one place.

The cleaning head gearbox side exposed

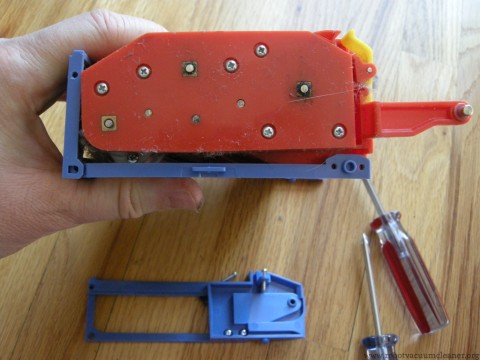
Here’s the cover on the gearbox. As you can see, we have six more screws that need to be removed and then we can take the side off. Remove and place the screws in a spot away from the other screws you pulled out previously, so that they don’t get mixed up.

Hair and debris in the gearbox

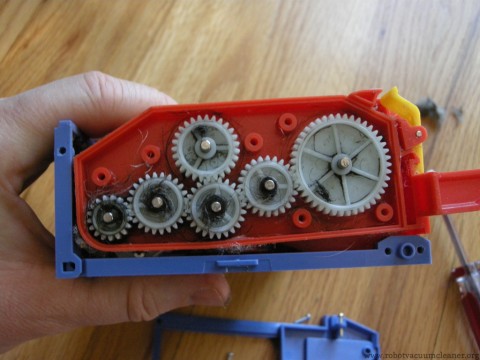
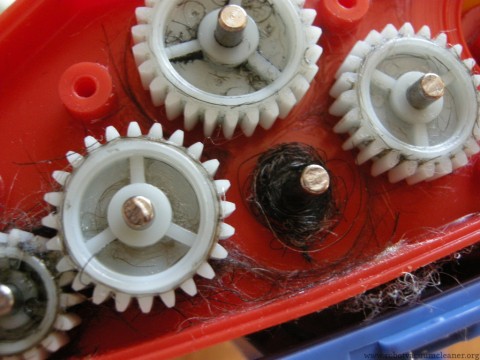
And here’s what might be in your Roomba’s Cleaning Head gearbox. My Roomba was functioning just fine, even with all this hair and debris, but you can see that there is some accumulation and that eventually this might render the module inoperable.

A roll of hair under a gear

While doing this cleaning, I only pulled one gear out at a time so that I wouldn’t lose the proper placement of the gears. I would guess that a person could probably take the gears and place them on a piece of paper with numbers to keep them straight, or find another way of keeping them in order, but I like to keep things simple. So what I would do is remove one gear, pull the hair off of it, and then remove any hair that was under it inside the gearbox.

It bears mentioning that the gearbox also contains a film of lubricant, and depending on your situation, you might be able to get away with just pulling out the hair and leaving most of the lubricant still in the gearbox. Not all kinds of lubricant are safe to use with plastic parts. If you know for a fact that you have a lubricant that is safe to use with plastic, then go ahead and really clean that gearbox out, and then put a little lube back in there. Otherwise, I suggest just doing your best to remove the hair and not wipe the gearbox out. (Note: Your local Radio Shack probably sells a plastic safe gel lubricant which would be appropriate.)

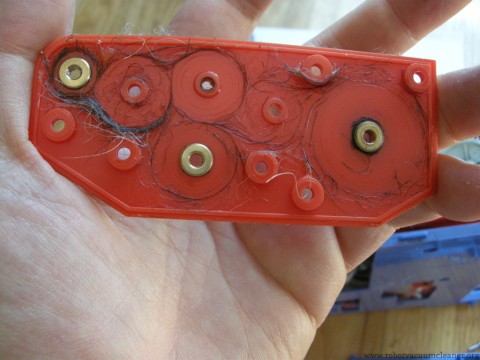
The inside of the gearbox cover

Here’s more area to clean. It’s worth noting that the engineers at iRobot have reinforced the plastic with brass for the holes that need it. I have found instructions online for boring out the insides of the gears in these gearboxes and installing gear bearings, but really, that’s something that a person shouldn’t be doing unless they have access to the proper tools for the job. Obviously, a metal gear train with bearings would be ideal. But nylon, stainless steel and brass have been used to make durable gear trains for a long time and in my humble opinion, the engineers at iRobot have created a suitable consumer-grade gear train. The problem is the holes for the brushes, not the gears themselves.

Put it all back together again

Once you’ve got the hair and fuzz and everything else out of the gearbox, carefully put it all back together again, and reassemble the robot following the instructions the other direction to assemble all the parts.

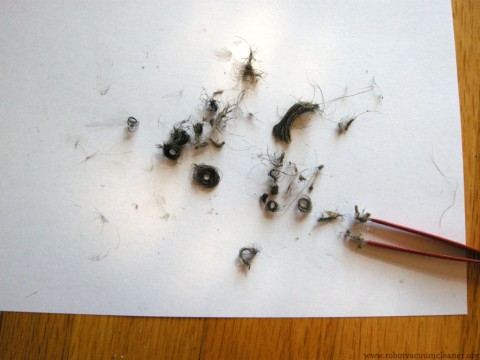
The debris from the gearbox

Here’s what I pulled out of this gearbox. I did this for the sake of demonstration, so if your Roomba’s brushes have stopped moving, I’m betting that you’ll be pulling a lot more than this out of your robotic vacuum.

Get a new iRobot Roomba 780 Vacuum Cleaning Robot on Amazon

iRobot Roomba 780 vs Roomba 535 Showdown!

Continuing our in-depth coverage of the iRobot Roomba 780 robot vacuum cleaner, I would be remiss in not comparing a Roomba 700 series to a 500 series. In particular, we took both robots and had them vacuum the same room, one after the other, the same way we did in our Mint Cleaner vs Roomba 700 Series comparison. I should also note that there is already some information comparing the 500 Series and 700 Series Roombas, here in our 780 review.

iRobot Roomba 500 Series vs 700 Series

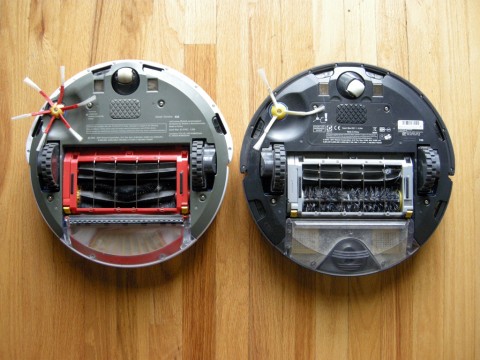
So let’s get down to brass tacks and talk about the differences between the two robots. On the left is a Roomba 535. One of the biggest differences is that all the 700 Series robots have on-board scheduling. As mentioned elsewhere, the 760, 770, and 780 have a new cleaning head designed to pick up finer particles, AreoVac Series 2 dust bins which have better suction, and a 50% longer battery life. In the 770 and 780 only, there is a new improved Dirt Detect feature and a bin full indicator light on the top of the robot. The 780 has a touchpad control instead of buttons on the top.

As you can see in the photo above, the 780 has two more cliff sensors behind the drive wheels, for a total of six. This enables the robot to back up, which is something that the 780 does and the 535 doesn’t do. In fact, I’m pretty sure that this is entirely new to the 700 Series robot vacuums. When the Dirt Detect kicks in, they do a spot clean, and unlike earlier Roombas, which circled around a dirty spot, the 700 series actually runs back and forth over the spot.

Another new feature that is easy to overlook is that the battery has a door. On the 535, you have to take the whole bottom off of the vacuum to get to the battery. On the 780, there is an easy to open port. You’ll also notice that the side brushes are different. The 535 has six arms while the 780 has three. I did not notice any real difference in performance between these two brushes.

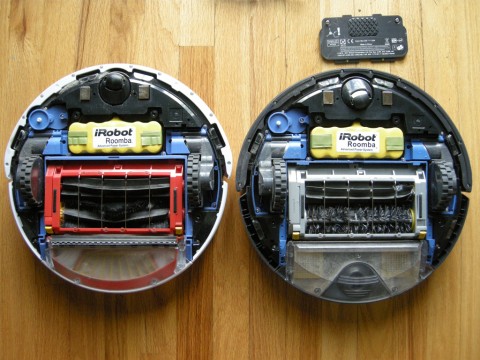
Roombas side by side with the bottom off

Here they are with the bottoms taken off. Again the 535 is on the left. As mentioned in the 780 review, the cleaning head has been redesigned. It has been my experience so far that it collects less hair around the beater bearings. The cleaning head in past Roombas has been something of a magnet for controversy because it has a gear box on one side which is designed in such a way that it’s not completely sealed. So some of them may slowly collect fine debris inside, and as such eventually it may have problems or need to be replaced. The jury is still out on whether or not this will continue to be a problem with the 700 Series, but a careful look at it reveals that some changes have been made to the design. Only time will tell whether or not this will make a difference.

The battery, side brush component, wheels, and even the cleaning head all appear to be interchangeable between the two robots. The caster wheels appear to be identical. I was able to pop all the modules all out of one robot, and then insert them into the other. I wasn’t brave enough to turn them on with the parts exchanged, but I did note that the side brush unit has identical part numbers on the circuit board. The wheel units appear to be identical with the exception that the newer wheels lack a hole that is in the older ones, and are labeled L and R.

The batteries for these two Roombas appear to be the same but have different part numbers. On the 500 Series, the battery is part number UNH071113 0740. On the 780, the battery is labeled “Model 3000”. Both are APS (Advanced Power System). Both are Ni-MH. Both appear to be made of the same number of cells. The Model 3000 is listed on iRobot’s site as having 3000 milliampere-hour (mAh). I’ve done a little research on the other battery and can only assume that it is the same.

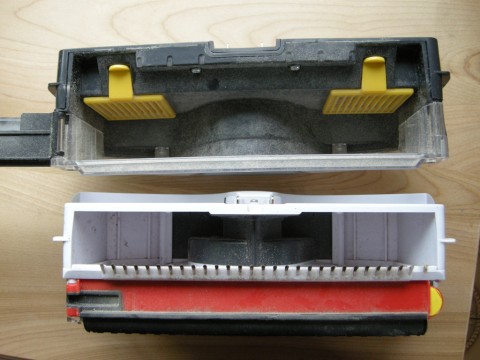
Roomba dust bin comparison AeroVac Series 2

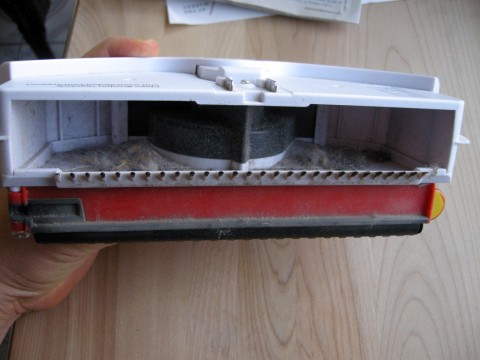
As mentioned above, the 700 Series Roombas have a new suction and bin component, called “AeroVac Series 2.” This new one is the top bin pictured here. The new bins are one single chamber with two HEPA filters on the top. When you really look at them with an eye towards comparison, it’s a little bit hard to tell which bin can hold more, because the older bins have an extra compartment on the bottom. Of course, this is the area that the smaller particles end up in, so it doesn’t really fill up as much, at least in my experience. If you consider them side by side, though, it does look like the newer one will hold more debris. The newer bin is easier to clean. You just knock it out, and then pull out the two filters and knock them out. With the older bins, you have to knock out the top, then open the bottom and knock it out, and then pull the filter out of the bottom and knock that out. The filter in the older ones is kind of fiddly with getting it put back in. It’s not a huge difference, but it’s noticeable.

When running the robots, they both seem equally loud. The Roomba 780 sounds a little different on carpet, like the beaters are working harder or something. It also appeared to me, just from watching the two robot vacuum cleaners in action, that the 780 did a better job of seeing objects in its path and slowing down before bumping into them. In other words, the 535 plowed into more furniture at full speed than the 780 did. Something interesting did happen when we first ran the 780 on one of our carpeted rooms, though. It looked to us like the carpet was cleaner than we could remember having seen it in a long time. We decided that further testing was required.

Cords and fringe to get the Roombas stuck

So we set up our living room as a test area. This included scattering some extra dirt and lint around to give the robots a good test. We ran the 500 series Roomba first, and then followed it up with the 700 series robot. The we did the same thing but backwards in another room in the house. In the living room test, we also set up a small area with some cords to see if either robot would get stuck, or if they would run off with any of the cords. The living room area is about 150 square feet and has a large area rug in the center. It also has an entertainment center, a dining table, a cabinet, a couch, and an easy chair. It needs to be noted that both robots were run with new batteries, but the 535 has an old filter, even though I spent some time cleaning it out before this test. So the 500 Series has a little handicap.

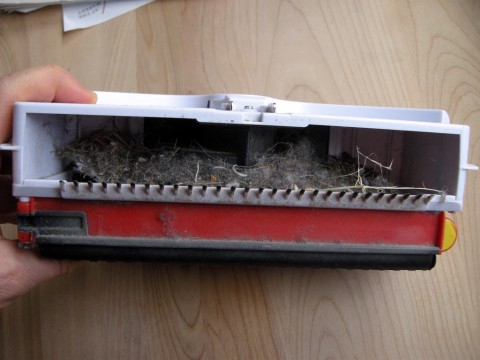
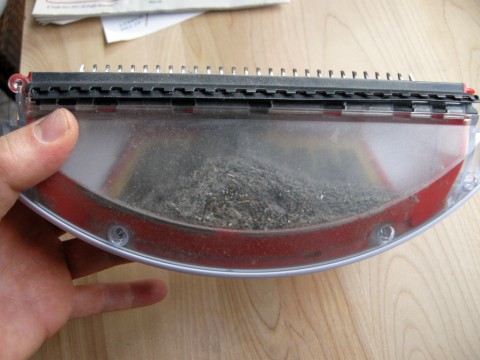
Dust bun from the 500 Series - top area

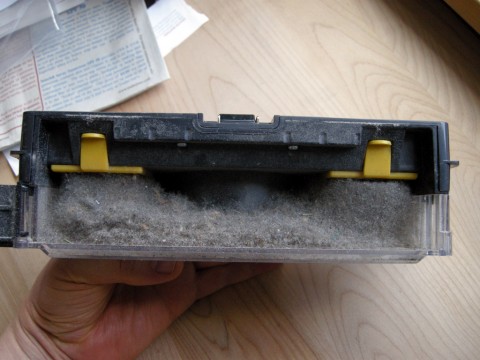
Bottom of the 500 Series Dust Bin

And here are the results from the 535 cleaning the living room. It took an hour to complete the room, and did a decent job of cleaning. There were a few visible fuzzies left in the carpet that the cleaning head didn’t seem to be able to pull out of the pile. The Dirt Detect light came on when it went over some of the dirty areas we had set up for the test. The 535 got kind of tangled in the cable trap, but made it out OK, and didn’t pull anything out after it. (I do have to say that this robot does have a reputation for getting tangled up in cords and once somehow managed to topple a floor lamp.) So as you can see, after cleaning the room, the dust bin was maybe a third full in the top, and there was some fine dust in the bottom chamber of the bin.

Then we ran the Roomba 780 in the same room, right after we ran the 535. The 780 finished the room in 45 minutes, which was 15 minutes faster than the other robot vaccum. Also, I noticed that the 780, when doing the rug, kept finding dirty spots. So the Dirt Detect light would go on, and the Roomba would go over the same spot a couple of times. I counted this four different times, and thought that it was pretty interesting, considering that the 535 hadn’t found any Dirt Detect areas on the rug. Also, as noted above, the 780 Roomba sounded like it was really doing more with the beaters on the rug. So how did it do?

Full 700 Series Roomba Dust Bin

Wow! I was really shocked to find that the 780’s dust bin was completely full! Check this out. We ran this robot after the 535 had cleaned the floor, and there was actually more debris in the dust bin than was in the 535.

We discussed the results and thought that maybe our carpet is an endless supply of lint and dirt. So of course the 780 would come up with some more dirt. But that doesn’t explain why the 780 would come up with more dirt. So we ran the 535 again.

Last 500 Series Cleaning Test Shot

And it basically came up with lint. Not satisfied, we ran the same test in a another carpeted room, except that in that room we ran the 780 first and then followed it up with the 535. I’m not going to post the photos from that one, but again, we found that the 780 picked up more debris, although the 535 found plenty too, it wasn’t as dramatic a difference.

So there you have it. It looks like the iRobot Roomba 780 is a real upgrade from a 500 Series robot vacuum cleaner. So if you’re trying to decide if you should spend the extra money on a newer Roomba, the answer is: Yes.

Get the iRobot Roomba 780 Vacuum Cleaning Robot at Amazon

More Information

Roomba 700 Series at Engadget
Roomba 700 Series on Gizmodo
Roomba 780 review at Robot Buying Guide